Monday, February 28, 2011

Magical Mushroom Dress from Simplicity 9557

OK... so I realize that sometimes I have a tendency to go a bit too far. Maybe I should have stopped at Mr. Jimmy's shirt? I couldn't the fabric is just too darn cool not to keep going. So, how far over the top should I go?

I used an old pattern I've used several times to make myself a mushroom dress.

Simplicity's 9557 is a pretty quick sew. Much easier than say.... a man's shirt.
I altered it a bit. I can't seem to resist the urge to make these things my own.


I added pockets again. I liked the way the elastic top pockets worked on the last dress so I included them here in contrasting mushrooms. You should be able to see the basic shape and size of the pocketty goodness in this shot. They're so easy to make.


Here are the pockets all installed and ready to use.


I also added a band of mustard contrasting fabric around the sleeve. I think I may have made it too long and will probably alter it to make it shorter.


Here is the almost finished dress. I still need to put in the back zipper. I think it might need some green tape around the waist with maybe two little bows placed at the darts. And I think I will shorten the sleeve trim a bit. I'll let you know how it goes.


*Added some alterations*
Slightly altered. I shortened the sleeve cuffs, added the waist band and the bows at the skirt darts. I like it a bunch better now. Just need a zipper and we can go out in style.

Mr. Jimmy's Magical Shirt from Simplicity 4760.

Picked up this ridiculous (ranunculus) at the grocery store. It's pretty much my very favorite flower. I really like the layers and layers of ultra soft petals. Wish I had better luck growing them here.


I finally used the great mushroom fabric I got from Hootcouture . I used the Simplicity pattern # 4760 to make Mr. Jimmy's retroish shirt. I had to alter it quite a bit to make it work. We went with shirt B, the short sleeve with a front bib in yellow on the cover.


I added mushroom fabric all over this shirt according to the wishes of a certain manfolk. I added it to the top collar and bib. I had to make a back bib to match and we cuffed the sleeves and the pockets.


We picked the contrasting fabric out together and drove the ladies at Fabric and crazy for an hour while we decided. We have fun there! It's like a date day for us.
(We really do have to get out more!)


Here it is all finished. I didn't put a tag in this one. His shirts usually have a little tag in the back that say "a Mr. Jimmy Original". Maybe I'll add it later......
I still have scads of both fabrics for a project for me later. Can't wait to get started!


Here is Mr. Jimmy being blurry and really showing some appreciation for his magical shirt. I think he likes it!

Saturday, February 26, 2011

Crushing!

Yesterday I crushed the tip of my baby finger.... TWICE!!!!!
It's really not so bad but the second smash made it explode a little bit so I'm playing it safe and protecting it with some bandage until it's less tender. I hope it doesn't put a cramp in my weekend craftiness.


I think I've gone a bit too far with the wardrobe colour choices today. The family doesn't seem to be appreciating the springiness of my mood.
Silly bunnies.
No fun.... no fun at all!

;P


Tuesday, February 22, 2011

Simplicity 3750, The New House Dress.

I try to make at least one new summer dress every spring. This time I lucked out and picked up some pretty fabric from the local thrift shop. It was one and three quarter yards of teeny blue specks on a white background. When I got it home I realized it was discoloured a bit. I decided to dye it slightly to cover up the spots. I used Simplicity's cute shirt pattern # 3750. I made it longer and added pockets. I love pockets on house dresses. I'm still going to have to make an underskirt for it. It's a bit short and a bit see through.


I used rit dye in turquoise and made it super thin. I didn't want to make the dots disappear, just wanted to tint the white and make the fabric look cleaner.


Here are the fabrics I found. The floral is upholstery weight and not so good for a dress. Maybe a skirt or garden apron?


Trying to get anything done around here involves moving a cat. He sure does like to be in the middle of things. So we had a cuddle and I asked Maggs to kitty sit so he would be occupied.


Here are the pockets going on. I used elastic to rouch the tops of them like the bodice is done. I also angled them a bit.


I needed some bias tape but didn't notice (because I never preread the pattern!) until it was too late. so I used scraps and made some really thin stuff. One day I will learn to check out the notions needed section on the back of the pattern before I start. But that'll probably take all the fun out of it.

The almost finished dress. I really like this one. I didn't like the corners of the neckline though. They were too fiddly. so I (covered them up) reinforced them with a couple of yo yos with buttons on top. I also added some buttons to the corners of the pockets to help things match. Today I'll make the underskirt. Now to decide, do I gather it or not?

Monday, February 21, 2011

Beautiful Pink and Green Roses.

Last week Mr. Jimmy and I brought home these fabulous roses from the grocery store. I couldn't resist them. We need some signs of spring to cheer us all.

Aren't they beautiful?


I think the green makes the pink feel fresher. I'll have to remember how these two colours play together for future projects.


Look what Mom did!!
She used the Christmas arrangement leftovers from the flowers that Auntie J and the A man sent.


BRILLIANT!!!
So pretty too. They look like they're supposed to be up there on the mantle. The copper matches the fireplace insert perfectly.

Sunday, February 20, 2011

The Making of Little Deer.

Here are the instructions for the Oh Deer project . I made her into a brooch. I have more plans for this little deer in the coming weeks. I really do want to know if you come up with any projects to use her in. Please share and we'll all play!

Here she is in all her deery glory. I think her name is Dorothy.


I copied this image onto a word document and sized it to fit the paper sheet without any borders.


Then I printed the image onto a sheet of Shrink It Plastic for printers.


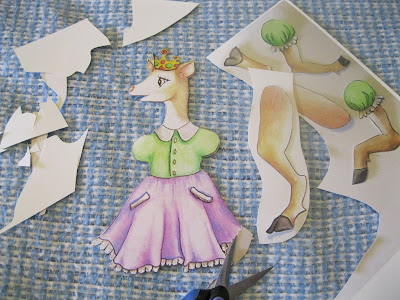
Using a small pair of scissors cut out the pieces


Place the arms where you want them


Pop a hole through the arm and the shoulder pieces at the same time using a hole punch.


Over lap the legs at the hip and pop a hole through there too.


Use the tip of the scissors to drill a hole in the skirt where the legs will join. Don't just push the scissors through there, twist them gently and the hole will get bigger gradually and not tear the plastic.


Here are the pieces as they will be baked. Get the oven on to 500 or the hottest setting and put a piece of parchment onto a baking sheet. I fold the edges so the parchment doesn't curl up on me and burn.

Bake each piece separately so you can keep an eye on them. If you put them all in at the same time I'm pretty sure there will be apocalyptic consequences.


This is the video of what happens in the oven. Keep the door open a crack so you can see what's going on and keep an oven mitt on so you can rescue things if you need to.
It's going to look pretty ugly for a while. Just let it happen and after it looks like it's stopped shrinking you can flatten things out.


After it was done shrinking I turned it over with tongs while it was still in the oven.


I pulled the door open and slid out the wrack and pan and used a smooth egg flipper to squash the piece flat while it was still hot. It cools very quickly so move fast.


You can see how small she is here in my hand.


One leg to go. You can really see how much the pieces shrink here with one still full size. The colours also deepen quite a bit.


Some things you will need to put her together.


Teeny plastic faceted beads in the same colours as her clothes. I put two for her arms and one for her skirt on head pins.


Put the beaded head pin through both the arm and the torso pieces.


Cut the head pin to 2 cm long with wire cutters, and turn the cut end with double round nose pliers so it is a spiral on the back of the piece. The spiral and bead will keep the wire headpin in place so the limb will move freely like a joint.


Repeat the process with the other arm and both legs.


I used the E 6000 glue to fix on some pretty flowers and ribbons and rhinestones. Add what you like or leave her plain.


I also glued a pin to the back.


I think she's going to be cute with spring blouses.

Don't forget to post a link to what you made in the comments box. I really am excited to see what you make.

:)

Saturday, February 19, 2011

Oh Deer Take Two.

I'm posting deer progress. I didn't know what she was going to be for sure at first, but now I know.
If you have any ideas please feel free to go ahead and use her to create something of your own..... but please, please send me a message or a link to what happened along the way.
I'm thinking of how to go about sharing some things with you all. This bloggie thing is about sharing and other bloggies out there seem to have things called giveaways. Giving away finished pieces (like an eye pendant) didn't feel right to me. So I'm going to try to publish some more printable projects for you to try this year. That way I'm sharing with more than just one. I need you to let me know how things go on your end once and a while. You know..... for encouragement.

I'll post the full project soon.
Here are the pieces.


She looks kind of funny just lying there all in pieces like this. I'd better hurry up and pull her back together.


It's not really a hurry up kind of day. George is demonstrating the days speed for us.
And yes, that is a catnip ball.

Monday, February 14, 2011

White Lace Stiletto Nails.

I missed having stiletto nails.
So I removed my green and blue spring nails.


Contrary to popular belief, wearing acrylic nails does not ruin your natural nails. Ripping the acrylics off ruins your natural nails. So if you get acrylics have the patients to remove them properly. My nails look pretty good for almost two years of acrylic wear (give or take a week here and there). I filed off the spring acrylics and gave myself a manicure and some primer.

Here are the steps I took to make the stiletto nails:


I used a semi opaque pinkish powder and liquid to build up and extend my natural nail beds. Stiletto nails look best on long nail beds I think.


I made a smile line with white opaque powder and liquid.


I made what I'm gonna call horns of white coming from the smile line to the tip of the extension.


Here is the second little horn coming from the smile line and heading up to the tip.


I filled all the open space on the free edge with clear sparkle mix.


I capped the whole thing in clear acrylic powder and liquid.


I used a fine paintbrush and some white watercolour to make some jittery lines that end in a part swirl on the nail bed. I also made some dots. I couldn't help myself.


I coated the whole thing with clear UV gel and set a rhinestone on each nail.
I do like me some bling.


Here is a shot with flash so you can see them a bit better. It's hard to get a good shot of monotone nails, especially on shadowy days like this.